when we left for our little christmas break we had most of the wall panels in place as well as many of the huge douglas fir beams. our roof panels were sitting around on the site just waiting to go up. while i was back on the east coast björn worked on a few of the finishing details that needed to be completed before we could begin to "fly" the roof panels.
 |
| beam pockets on the second floor |
 |
| the douglas fir beam on the second floor |
our newest crew member matt was instrumental in accomplishing many of these goals. he built us a set us stairs so now getting up to the second floor is a breeze, he also finished all of the window openings and assisted björn in prepping all of the roof panels.
 |
| our stairwell |
 |
| björn and the guys also built the loft while I was gone |
 |
| under the loft is where the dining area will be |
we began placing the roof on friday. mark yerbic from
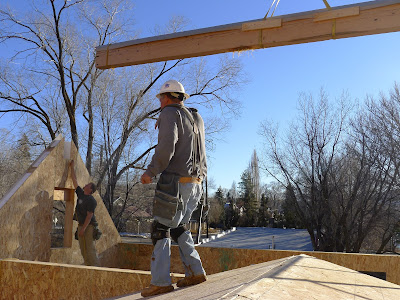
big sky came down to assist us with the first few panels to make sure we were understanding everything. the first panels to go on were the kitchen. these consist of three panels for each side of the roof, which we assembled on the ground to make one large piece. the panel was then attached to the skytrak using a lifting plate. this is basically a large plate that is screwed into the panel with a large strap attached. björn then lifted the panel and moved it into place. the guys are positioned to guide the panel and make sure it sits down in the proper location.
 |
| Attaching the roof panel to the skytrak boom |
 |
| lifting plates and the skytrak do the heavy work |
the roof panels are bearing on the outside wall and the center beams and are held down using very long screws. its actually a pretty simple system and because we have a 45 degree pitch on the two sections of the house the whole thing fits together in a really clean and simple way.
 |
| moving the first roof panel into place |
 |
| björn eases the panel down |
 |
the view from inside the kitchen as the panel comes down
|
 |
| the panel is in place |
 |
the vertical wood blocks keep the panel from sliding off the
side wall while it is screwed in place |
 |
making sure the panel is flush wit the exterior wall before screwing it into place
|
lucky for me björn waited to place the giant beam until I returned. this monster spans the whole 30 foot great room and is a massive 9" wide by 18" high and weighs a ton (well not really but its heavy). the skytrak had no problem picking it up and moving it into place.
 |
| matt guiding the beam into the pocket above the loft |
 |
| the other side of the beam- a perfect fit |
 |
| working on the main house roof |
there are more than 20 panels that make up the roof and you can see most of the process of putting them up
here. check back tomorrow for an update of the completed roof!


Those roof panels are amazingly thick! I’m pretty sure that it can withstand most weather changes and forms of infestation. Man, it looks formidable, and good thing that skytrak is there to do the heavy lifting for you. Seeing this sort of under-construction phase likewise makes me anticipate the outcome more. Best of luck to everyone!
ReplyDeleteRolf Matchen
Seeing these photos makes me want to volunteer and give you guys a hand! =) I mean, the weather is perfect, plus the equipment are ready. The only thing needed are cooperation and total manpower to finish the project (though I assume that this is done by now). Great job, everyone. I wish to see the outcome of your hard work!
ReplyDeleteGabrielle Jeromy
I bet that this house looks good now. It’s been a year since the construction started, and I have a strong hunch that this has become one of the most eye-catching houses in the neighborhood. Why? It’s because everyone put their efforts to make this project successful. Aside from that, the materials used are of top-quality!
ReplyDeleteSierra Nordgren
I’m excited to see this house as a whole. I do agree with what Sierra said. This house is a stand out as of today, and I bet the interiors are also beautiful. How about letting us get a peek of this house? =)
ReplyDeleteNelson Mcglaughlin